Step 1: Get PrintFriendly Button Code
Goto PrintFriendly.com/button. Select Blogger/Blogspot. Choose your button style, and copy and paste the PrintFriendly code snippet.
Step 2: Edit Your HTML Template
Customize Your Button
Align Button to Right
To align your PrintFriendly button to the Right. Add inline CSS to the PrintFriendly code snippet.
Step 1: Find the two <div class='pfbutton'>, inside your PrintFriendly button code.
Step 2: Add style='float:right;' to the div.
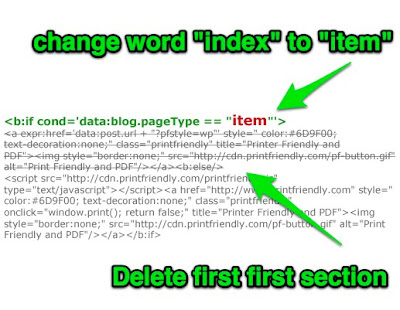
There's two sections to the code snippet. The "Index" section adds the button to the homepage, "Item" adds the button to the post/article page.
Change the word "Index" to "Item". Then, delete the first section.

Goto PrintFriendly.com/button. Select Blogger/Blogspot. Choose your button style, and copy and paste the PrintFriendly code snippet.
Step 2: Edit Your HTML Template
- Log into Blogger or Blogspot
- Click Design > Edit HTML
- Click Check BoxExpand Widget Templates (don't miss!).
Step 3: Paste Button Code
Customize Your Button
Align Button to Right
To align your PrintFriendly button to the Right. Add inline CSS to the PrintFriendly code snippet.
Step 1: Find the two <div class='pfbutton'>, inside your PrintFriendly button code.
Step 2: Add style='float:right;' to the div.
Use a Your Own Graphic/Button
In the PrintFriendly code snippet, there's two images (one for list page, the other for post pages). Find the image tags and then change the src to the URL of the graphic/button you would like to use.
Show Only on Post Pages (not on homepage)
There's two sections to the code snippet. The "Index" section adds the button to the homepage, "Item" adds the button to the post/article page.
Change the word "Index" to "Item". Then, delete the first section.


No comments:
Post a Comment